Parshvakonasana (Side Angle Pose): Step-by-Step Guide, Tips & Benefits
Introduction
Parshvakonasana, known as Side Angle Pose, is a powerful standing yoga asana that lengthens and strengthens your body from head to toe. The Sanskrit name comes from: "parshva" (side), "kona" (angle), and "asana" (pose or posture).
Essence: Energizing & grounding — this posture unlocks your sides and brings a sense of stability.
If you’ve ever felt stiff after a long day of sitting, or you want to stretch your entire body in one go, Parshvakonasana may quickly become your new favorite!
Step-by-Step Guide to Parshvakonasana
- Start in Mountain Pose (Tadasana):
Stand tall, feet together, arms at sides. Take a few deep breaths to center yourself.
- Step Wide:
Inhale, and step your feet about 3-4 feet apart. Raise your arms parallel to the floor, palms facing down.
- Turn Your Feet:
Turn your right foot out 90°, left foot slightly in. Align your right heel with your left arch.
- Bend the Front Knee:
Exhale, bend your right knee directly over your right ankle, forming a right angle (thigh parallel to the floor if possible).
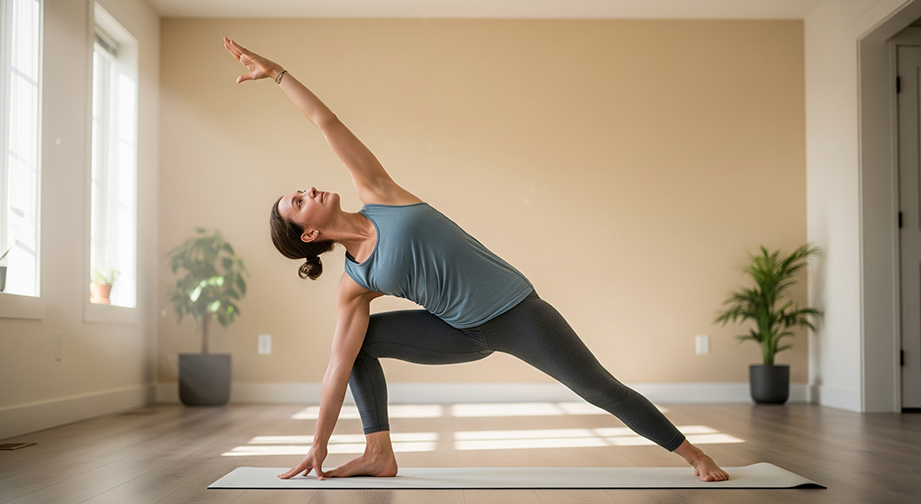
- Place the Arm:
Inhale, extend your right arm forward, then lower it so your forearm or fingertips come to the floor or a block outside of your right foot.
Beginner: Rest right forearm on your right thigh instead.
- Reach Up:
Stretch your left arm overhead, palm facing down or forward, so it forms a straight line from your left heel to your left fingertips.
Look up towards your left arm (or down if your neck is sensitive).
- Breathe:
Take 3–8 deep breaths, feeling the lengthening through your side and strength in your legs.
- Release and Switch Sides:
Inhale to straighten your front knee, come back to center. Repeat on the left side.
Tip: Practice 2-3 rounds on each side, holding each for 20–40 seconds. Adjusting the duration based on your comfort.
Modifications & Intensifications
- For beginners: Place your forearm on your thigh, use a yoga block under your hand, or keep the stance shorter.
- To intensify: Lower your hand to the floor outside the foot, keep your back leg super straight, or bind the arms (wrap lower arm under the thigh and top arm behind the back).
Alignment & Safety Tips
Key Alignment Cues
- Knee must be directly over ankle (never collapsing in).
- Back heel pressing firmly down, outer edge grounded.
- Torso long — avoid collapsing toward the floor; create space from waist to armpit.
- Shoulders stacked, not hunched forward.
Common Mistakes
- Knee rolling inward — keep it pointing over the middle toes.
- Leaning weight into the hand — support with strong legs and core.
- Collapsing upper shoulder — keep chest open and top arm extended.
Safety Precautions
- Avoid deep bending if you have knee, hip, or lower back injuries.
- Prenatal caution: Practice with a wider stance, forearm on thigh, or skip if unstable.
- Be mindful if you have high blood pressure. Keep gaze forward or downward.
Benefits of Parshvakonasana
Physical Benefits
- Stretches hips, groin, spine, waist, and shoulders
- Strengthens legs, knees, ankles, and core
- Improves stability, balance, and posture
Mental Benefits
- Relieves stress and fatigue
- Promotes focus and groundedness
- Encourages a sense of expansion and energy
Energy / Chakra Connection
- Stimulates the Root (Muladhara) and Solar Plexus (Manipura) Chakras
- Promotes feelings of security, confidence, and vitality
Contraindications
- Avoid if you have recent hip, knee, or ankle injuries.
- Not recommended for those with low blood pressure or migraine.
- Pregnant practitioners: Use support and avoid long holds.
Safe alternatives include Warrior II (Virabhadrasana II) or keeping both forearms on thighs for more support.
Beginner’s Tips & Variations
- Use props: A block under your hand, or practice by a wall for balance.
- Easier variation: Stay higher, keeping your forearm on your thigh (not pushing down, just resting lightly).
- Gentle flow: Move in and out with the breath, rather than long holds.
- Advanced: Try bound Side Angle Pose (wrap the lower arm under the thigh and upper arm behind the back, clasping hands).
How to Include Parshvakonasana in a Yoga Flow
- Works beautifully as a main practice or as part of a standing sequence.
- Pairs well with Warrior II (Virabhadrasana II), Triangle Pose (Trikonasana), and Reverse Warrior (Viparita Virabhadrasana).
- Great option after Sun Salutations for a full body stretch and strengthener.
Mind-Body Connection
Parshvakonasana is not just a physical yoga position — it’s about feeling grounded in the present. As you breathe deeply in this posture, notice how your side body expands, and let any tension in your mind melt away. Energetically, this pose connects you to your core and the stability of the earth beneath you.
Summary Box: Parshvakonasana (Side Angle Pose)
- Sanskrit Name: Parshvakonasana (?????????????)
- Level: Beginner to Intermediate
- Focus Areas: Legs, hips, side body, core, shoulders
- Duration: 20–40 seconds per side (2–3 rounds)
- Best Time to Practice: Morning or evening, on an empty stomach
FAQs about Parshvakonasana (Side Angle Pose)
Q: Can I do Parshvakonasana if I have knee pain?
A: Use a higher support (hand on thigh or block) and avoid deep knee bends. If pain persists, skip the pose.
Q: Should my back foot point forward or slightly angled?
A: Your back foot should be angled slightly in (about 45°), with the outer edge firmly grounded.
Q: Is this pose safe during pregnancy?
A: Yes, with modifications such as a wider stance, support under your hand, and not staying too long.
Q: How often should I practice Parshvakonasana?
A: 2–4 times a week, or whenever you want a quick stretch and energizer!
Q: Which muscles does Side Angle Pose work?
A: Legs (quads, hamstrings), glutes, core, obliques, back, and shoulders.