Kaundinyasana (Kaundinya's Pose Balancing): Step-by-Step Guide, Benefits, Tips & More
Introduction
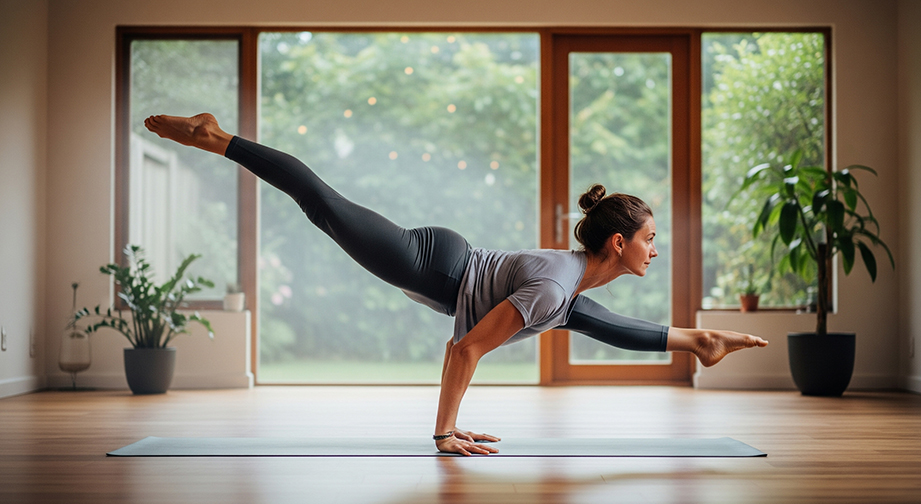
Kaundinyasana, commonly called Kaundinya’s Pose Balancing or Sage Kaundinya's Arm Balance, is a dynamic arm balance yoga asana that brings together strength, balance, and focus. In Sanskrit, "Kaundinyasana" translates to "the pose of Sage Kaundinya," a revered yogi symbolizing wisdom and perseverance. At its heart, this posture is energizing and balancing—challenging your body and mind to unite in a single, empowering moment.
If you’ve ever admired those Instagram-worthy arm balances but thought, "That can’t be me!"—you’re not alone. Kaundinyasana looks impressive, but with patience, proper guidance, and some foundational strength, you can absolutely work toward achieving this empowering pose.
Step-by-Step Guide to Kaundinyasana
- Begin in Downward Facing Dog (Adho Mukha Svanasana).
- Step your right foot forward between your hands and plant it firmly. Let your left leg extend back, balancing on your toes (like a lunge).
- Cue for Inhale: As you inhale, carefully bring your right knee to touch your right upper arm/triceps, bending elbows into a Chaturanga (low pushup) position.
Cue for Exhale: Exhaling, shift your weight forward, keeping elbows hugging in, and lean the torso forward over your arms.
- Breathe deeply and press your hands evenly into the mat. With control, lift your back leg (left leg) off the floor, extending it straight behind you. Your right leg can extend sideways (for Eka Pada Kaundinyasana I) or rest over your right arm (for a supported variation).
- Gaze slightly forward—not down—to keep the neck long. Keep breathing evenly throughout the pose.
- Hold for 2–5 breaths or up to 20–30 seconds. Slowly lower back down and repeat on the other side.
For Beginners:
- Keep the back foot (left toes) on the mat as you build strength.
- Try the supported version: Rest your right thigh directly on the upper arm instead of floating the leg.
- Use yoga blocks under your hands for extra lift.
For Advanced Practitioners:
- Attempt to straighten both legs as much as possible.
- Transition into other arm balances, like Side Crow or Flying Splits.
- Increase the hold duration up to 45 seconds per side.
Alignment & Safety Tips
Key Alignment Cues:
- Keep elbows close to your ribcage; avoid splaying them out.
- Spread your fingers wide for a solid foundation.
- Engage your core and think of “lifting from your heart/chest.”
- Shoulders stay away from ears; neck remains long and relaxed.
Common Mistakes:
- Letting elbows splay wide, which destabilizes and stresses shoulders.
- Dumping weight sharply onto the wrists (lift through the core).
- Looking straight down—look a little forward for better balance.
Safety Precautions:
- Avoid if you have wrist, shoulder, or lower back injuries.
- Not recommended during pregnancy or for those with high blood pressure.
- Always warm up wrists and shoulders before attempting.
Benefits of Kaundinyasana
- Physical Benefits
- Builds core and arm strength
- Improves balance and coordination
- Enhances flexibility in hips and hamstrings
- Lengthens the spine and refines posture
- Mental Benefits
- Promotes focus and concentration
- Reduces stress and calms the mind
- Inspires a sense of accomplishment and confidence
- Energy/Chakra Connection
- Stimulates Manipura (Solar Plexus) Chakra—boosting willpower and self-belief
- Encourages energetic flow throughout the body
Contraindications
- Should be avoided if you have:
- Recent or chronic wrist, elbow, or shoulder injuries
- Painful lower back or herniated discs
- Pregnancy
- High blood pressure or certain heart conditions
- Safe Alternatives: Try Side Plank (Vasisthasana) or Sphinx Pose for a gentle core and arm engagement.
Beginner’s Tips & Variations
- Props: Use yoga blocks under your hands for extra height and support. Place a folded blanket under knees or wrists for cushioning.
- Gentle Variation: Keep both feet on the mat and just practice shifting weight onto the arms.
- Wall Support: Position yourself near a wall so you can catch your back foot, building confidence in the lift.
- Advanced Variation: Straighten both legs fully (Eka Pada Kaundinyasana II), or flow directly from Side Crow to Kaundinyasana for an extra challenge.
How to Include Kaundinyasana in a Yoga Flow
- Kaundinyasana fits best as a main practice or peak pose after warming up wrists, core, and hips.
- Pairs well with:
- Side Crow (Parsva Bakasana)
- Lizard Pose (Utthan Pristhasana)
- Chaturanga Dandasana
- Follow up with gentle counterposes like Child's Pose or Seated Forward Fold.
Mind-Body Connection
While in Kaundinyasana, focus on your breath and inner balance—the pose is as much about steadying the mind as it is about steadying the body. If you wish, bring attention to your solar plexus (Manipura Chakra) to tap into courage, clarity, and personal power.
Summary Box
- Asana Name: Kaundinyasana (Kaundinya's Pose Balancing)
- Level: Intermediate to Advanced
- Focus Areas: Arms, Core, Hips, Balance
- Duration: 20–30 seconds per side, up to 3 rounds
- Best Time to Practice: Morning or whenever you have most energy
Frequently Asked Questions about Kaundinyasana
Is Kaundinyasana suitable for beginners?
Beginners can start with prep variations and modifications; work gradually toward the full posture as strength and confidence build.
What muscles does Kaundinyasana work?
The pose builds strength in the wrists, arms, shoulders, chest, core, and also stretches the hips and hamstrings.
How can I avoid wrist pain in arm balances?
Warm up wrists, distribute your weight evenly across the palms, and use props or take breaks as needed.
What can I do if my back leg doesn’t lift?
Keep your back toes on the ground and practice engaging your core more. Over time, your strength and balance will improve.